Tutorial: Using RFtap to Decode RDS
In this post we’ll demonstrate:
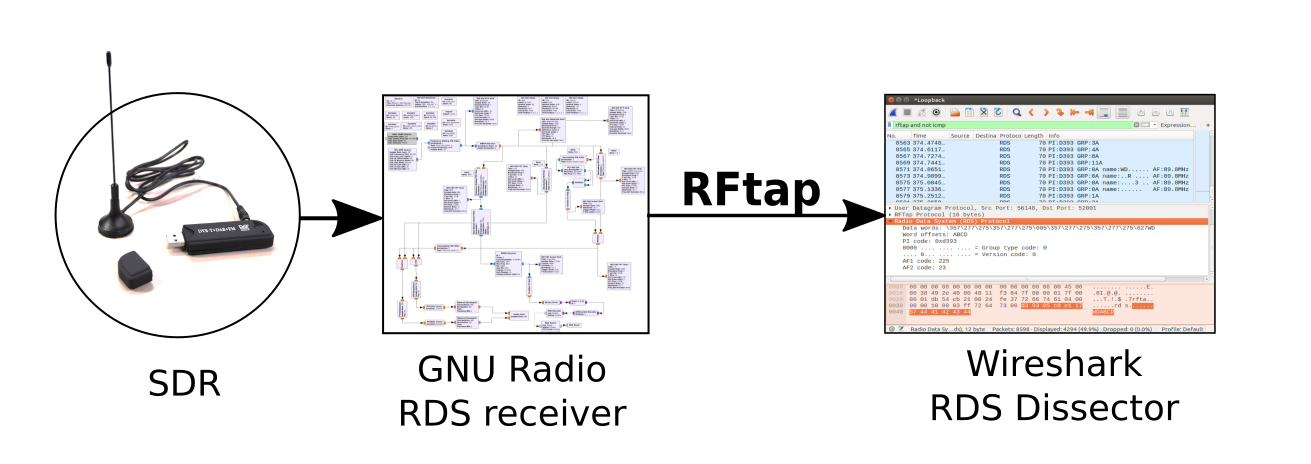
- how to use RFtap to connect a GNU Radio flowgraph to Wireshark,
- how to use Wireshark to easily dissect a new protocol, and
- how to add metadata (such as the carrier frequency) to each RFtap packet.
What is RFtap?
RFtap is a simple protocol designed to provide RF (Radio Frequency) metadata about packets, such as:
- Accurate signal and noise power
- Accurate timing and phase information
- Accurate Carrier and Doppler frequencies of every packet, and more.
You can think of RFtap as the “glue” between GNU Radio and Wireshark, allowing access to RF metadata from Wireshark or Scapy. Read an Introduction on RFtap.
The RFtap protocol is designed to encapsulate any type of packet: Wi-Fi, Bluetooth, or packets from any proprietary protocol.
Radio Data System (RDS)
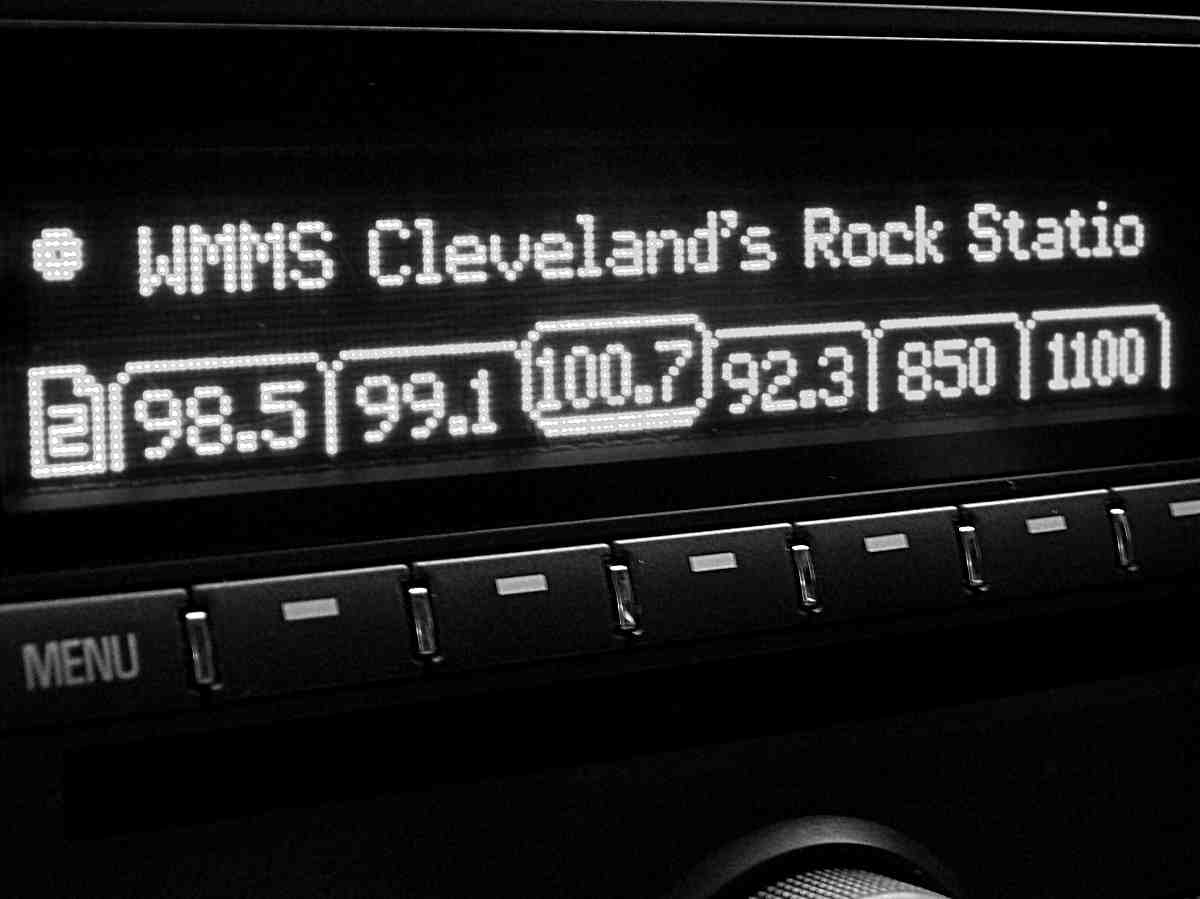
Radio Data System (RDS) is a digital sub-channel in commercial FM radio broadcasts. RDS standardizes several types of information transmitted, including time, station name, song name and alternate frequencies, read more about RDS on Wikipedia.
We’ll start with the excellent GNU Radio FM/RDS receiver. You’ll need to install GNU Radio from source (I followed these instructions), install GNU Radio’s RDS receiver (gr-rds) and gr-rftap. You’ll also need some SDR hardware, such as the RTL-SDR receiver.
Presentation about GNU Radio RDS receiver (video and slides)
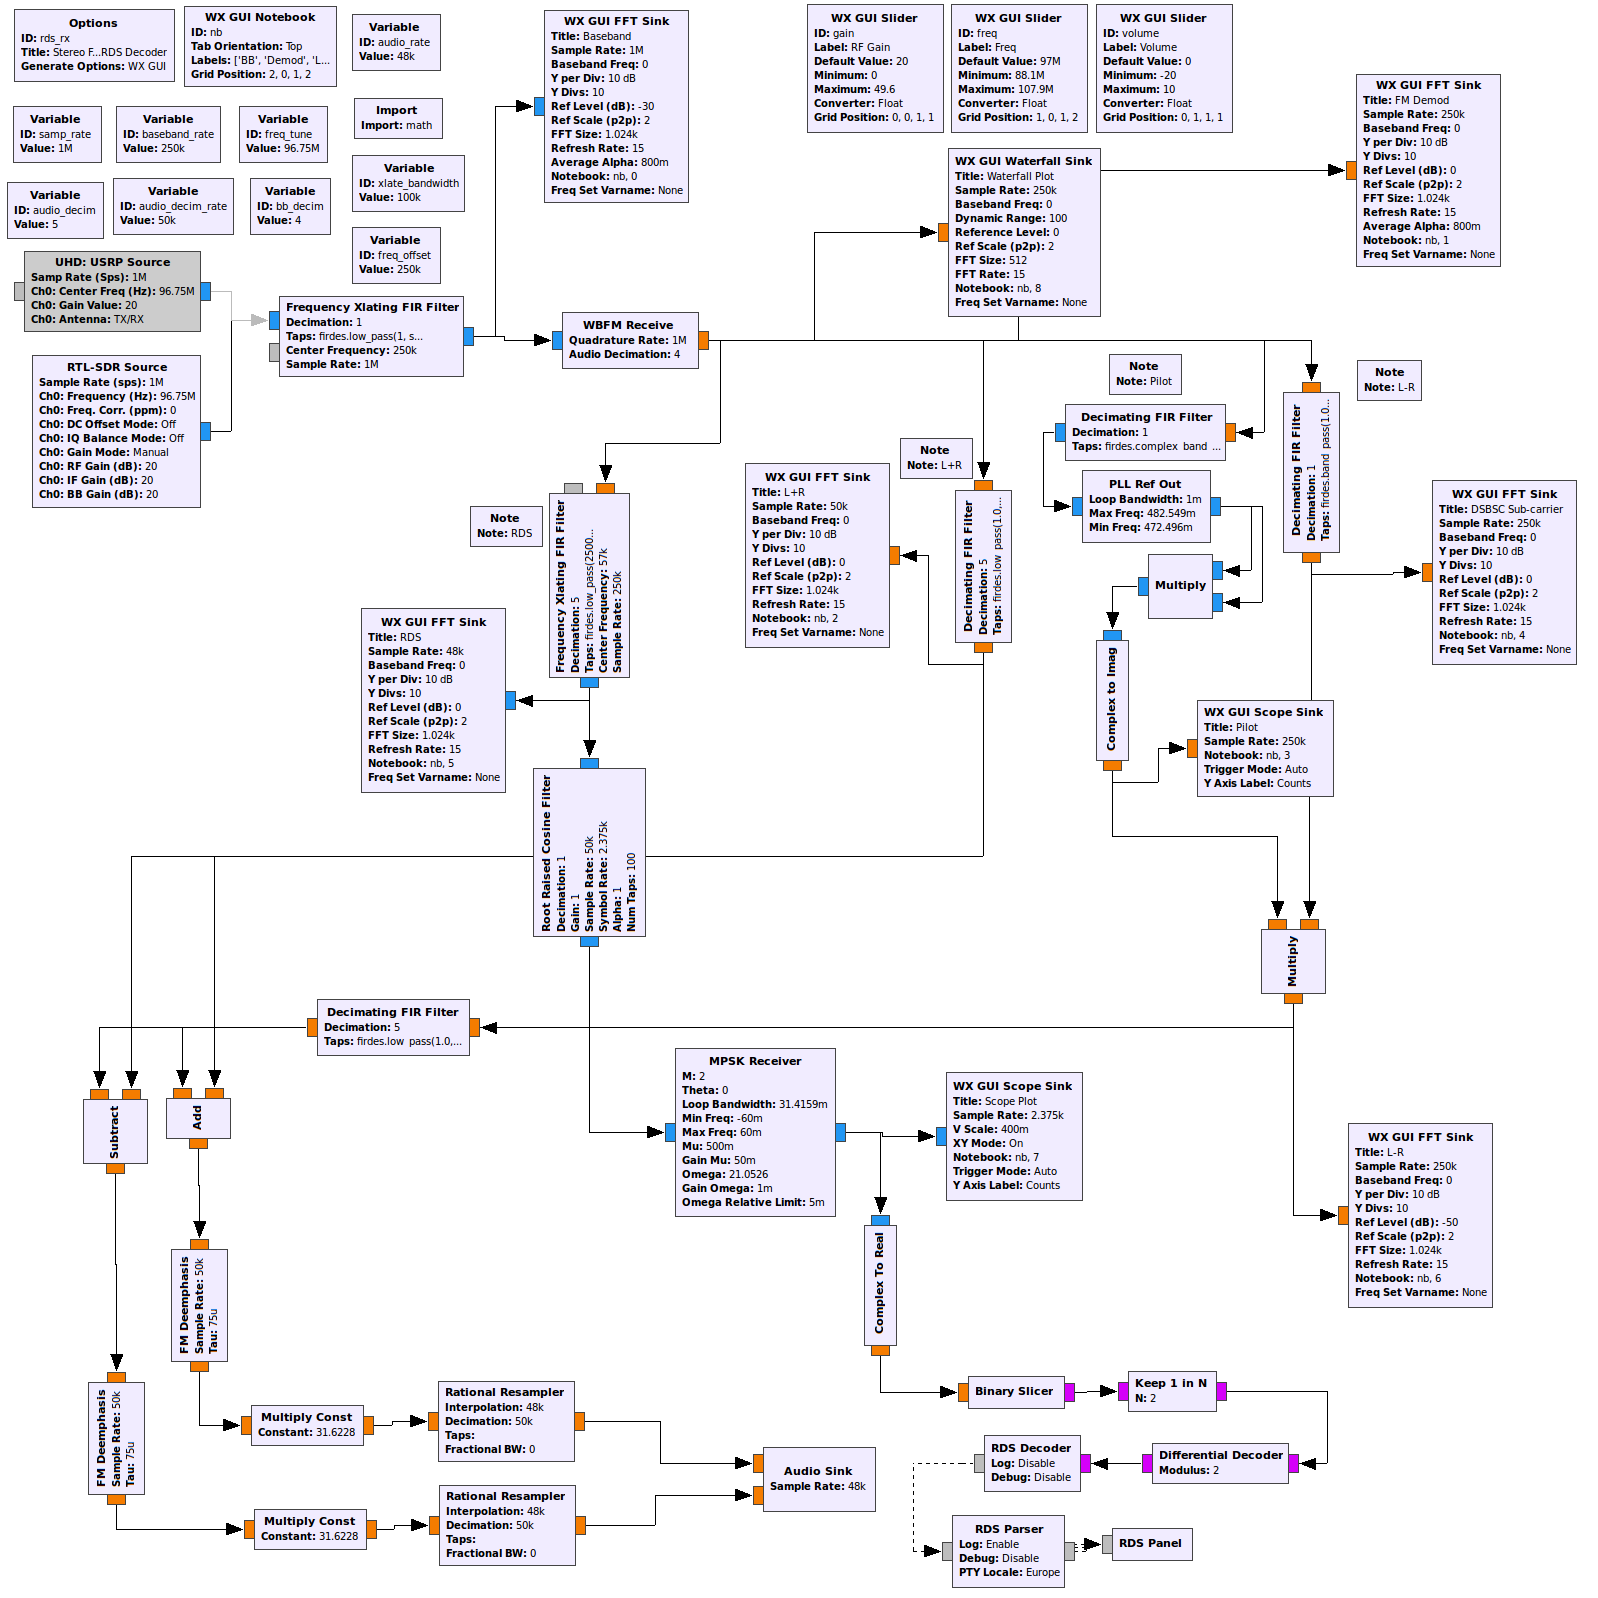
Running the rds_rx.grc flowgraph demonstrates all the stages of receiving a stereo FM+RDS signal, each tab showing a different view of the demodulation process. Verify that you can tune to a local FM station with RDS data:
$ gnuradio-companion gr-rds/apps/rds_rx.grc
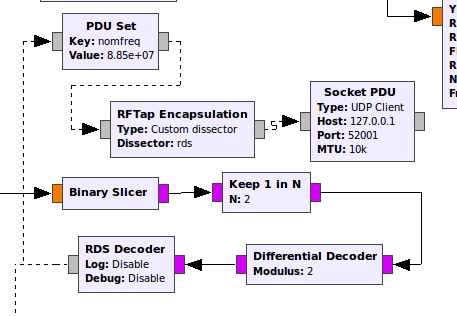
The RDS decoding is done at the bottom-right part of the flowgraph. It consists of:
- The RDS decoder, receiving raw bits and sending completed RDS frames
- The RDS parser, receiving RDS frames and sending station/song names to the GUI
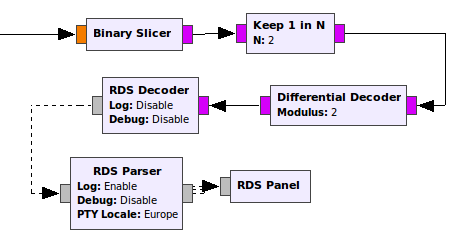
Tapping the Flowgraph
To send RDS frames to Wireshark, we will use the RFtap Encapsulation block to tap RDS frames as they’re exiting the RDS decoder. The RFtap block can be attached to any PDU message ports (the gray-colored ports in the flowgraph). It wraps the incoming PDU messages with an appropriate RFtap header. The packet can then be streamed to a pcap file, or to a local UDP port for Wireshark.
Sidenote: Data Link Type (DLT) or Dissector Name?
In order to be able to correctly interpret the (RDS) data packets, Wireshark needs to know the type of packet (Wi-Fi, Bluetooth, RDS, etc). There are several ways to do that. If the packet is of one of the standard types appearing in the Data Link Type (DLT) list, you can just specify the DLT value in the RFtap block itself, or in the PDU metadata as “dlt” field. For example, Wi-Fi packets would have a DLT of 105.
Alternatively, if the packet type isn’t listed in the DLT list, you can specify a Wireshark dissector name to be used for dissecting the packets. This can be specified in the RFtap block itself (option: Custom Dissector), or as part the incoming PDU metadata, as “dissector” field. We will use the “Custom Dissector” option, and specify the dissector name as rds (Wireshark dissector names are typically all-lowercase).
Receiving the Packets in Wireshark
Upon running the modified flowgraph (and tuning to an RDS-capable FM station), RFtap packets should start flowing to localhost interface (127.0.0.1). Install Wireshark version 2.3 or higher. We’re ready to fire up wireshark:
$ wireshark -v
Wireshark 2.3.0

$ wireshark -i lo -k
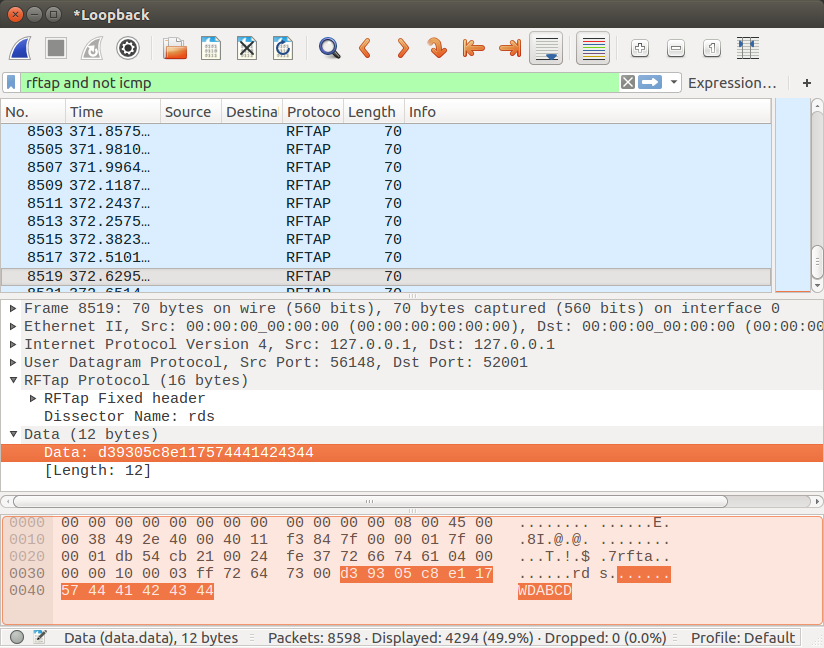
Success! We can see the packets arriving to wireshark, each RDS packet is encapsulated in a RFtap packet. Since wireshark doesn’t have a rds dissector yet, all RDS packets are labeled as plain “data” frames embedded in a RFtap frame:
Adding a Dissector
Next we’ll add a RDS dissector to wireshark. There are two ways to write a dissector: c and lua. For simplicity we’ll choose lua. Our rds dissector will decode the station identification (PI), the station name fragments and the alternate frequencies where the station can be received:
-- lua wireshark dissector for RDS (Radio Data System)
-- put this file in: ~/.config/wireshark/plugins/rds.lua
-- or in (old location): ~/.wireshark/plugins/rds.lua

-- RDS Standard: http://www.nrscstandards.org/sg/nrsc-4-b.pdf
rds_proto = Proto("rds","Radio Data System (RDS)")

local f_pi = ProtoField.uint16("rds.pi", "PI code", base.HEX, nil, nil, "Program Identification (PI) code")
local f_group_type = ProtoField.uint16("rds.group", "Group type code", base.DEC, nil, 0xf000, "Group type code (0-15)")
local f_version_code = ProtoField.uint16("rds.version", "Version code", base.DEC, nil, 0x0800, "Version code (A=0, B=1)")
local f_af1 = ProtoField.uint8("rds.af1", "AF1 code", base.DEC, nil, nil, "First Alternate Frequency (AF) code")
local f_af2 = ProtoField.uint8("rds.af2", "AF2 code", base.DEC, nil, nil, "Second Alternate Frequency (AF) code")
local f_altfreq = ProtoField.float("rds.altfreq", "Alternate Frequency", "Alternate Frequency for this station")

rds_proto.fields = {f_pi, f_group_type, f_version_code, f_af1, f_af2, f_altfreq}

function rds_proto.dissector(tvb,pinfo,tree)
    pinfo.cols.protocol:set("RDS")
    pinfo.cols.info:set("")
    local t = tree:add(rds_proto,tvb:range(0,12))

    -- Program Identification (PI), aka station ID
    local pi_code = tvb:range(0,2):uint()            -- fetch value
    t:add(f_pi, tvb:range(0,2))                      -- put in tree
    -- RDS frame type and version
    local group_type = tvb:range(2,2):bitfield(0,4)  -- fetch value
    t:add(f_group_type, tvb:range(2,2))              -- put in tree
    local version_code = tvb:range(2,2):bitfield(4,1)  -- etc...
    t:add(f_version_code, tvb:range(2,2))
    -- Wireshark INFO column
    local s = string.format('PI=%04X GRP=%u%s', pi_code, group_type, (version_code==0 and 'A' or 'B'))
    pinfo.cols.info:append(s)

    -- Add station name to INFO column
    if group_type == 0 then
        local name_fragment = tvb(6,2):string()
        pinfo.cols.info:append(' <' .. name_fragment .. '>')
    end

    -- helper function for decoding Alternate Frequency code
    local function decode_altfreq(offset)
        local af = tvb:range(offset,1):uint()
        if af > 0 and af <= 204 then
            local freq_Hz = 87.6e6 + 0.1e6*(af-1)  -- field value (Hz)
            local freq_MHz = freq_Hz/1e6+0.01  -- for display (MHz)
            -- add Alternate Frequency field to dissection tree
            s = string.format('Alternate Frequency: %.1f MHz', freq_MHz)
            t:add(f_altfreq, tvb:range(offset,1), freq_Hz, s)
            -- Add Alternate Frequency to INFO column
            pinfo.cols.info:append(string.format(' AF=%.1fMHz', freq_MHz))
        end
    end
    -- Decode Alternate Frequency fields
    if group_type == 0 and version_code == 0 then
        t:add(f_af1, tvb:range(4,1))  -- rds.af1 (raw code)
        decode_altfreq(4)             -- rds.altfreq (frequency in Hertz)
        t:add(f_af2, tvb:range(5,1))  -- rds.af2 (raw code)
        decode_altfreq(5)             -- rds.altfreq (frequency in Hertz)
    end
end
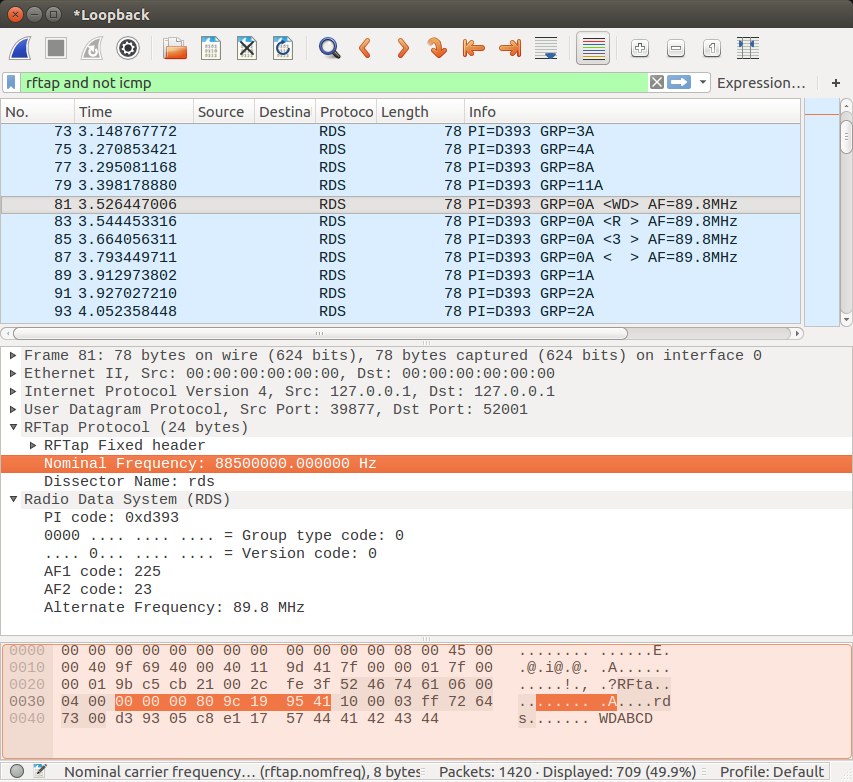
Result:
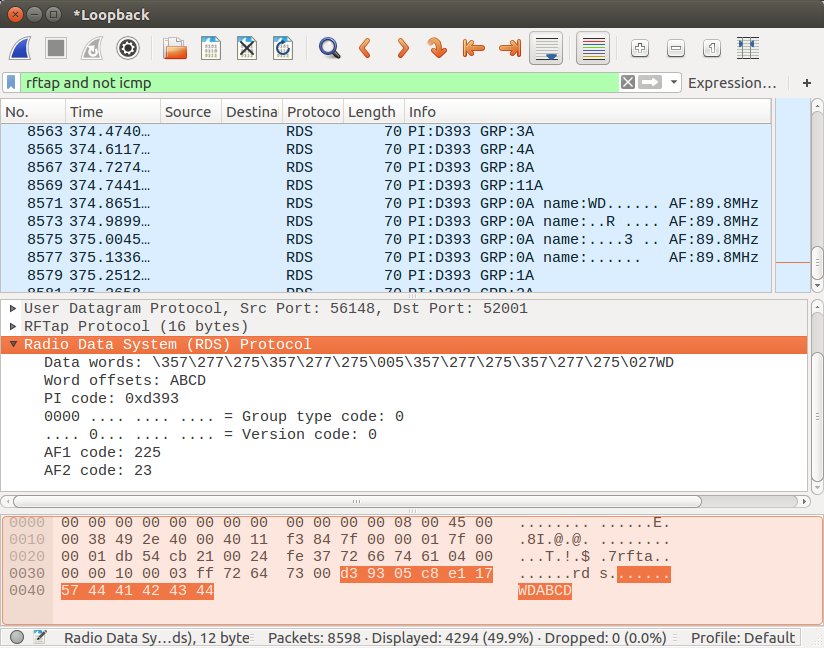
Notice that we can also access the new RDS fields programatically, for example we can type this in Wireshark display filter: rds.altfreq > 100e6 to see all the packets with alternative frequency higher than 100 MHz.
Adding RF metadata
Now that we have the basic infrastructure in place, we can start adding interesting RF metadata to the packets. For demonstration, we’ll add the Carrier Frequency metadata to all RFtap packets.
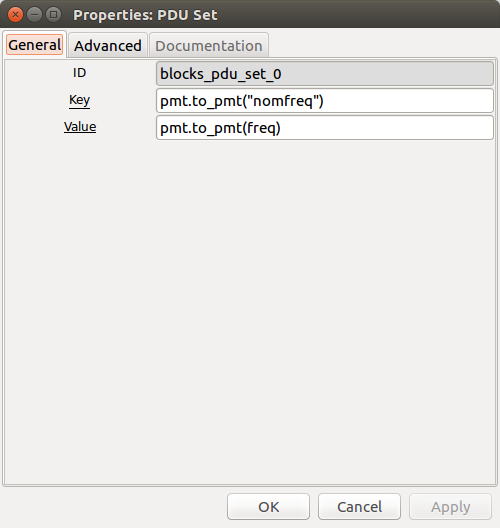
Adding the carrier frequency is easy: there is already a freq variable in the flowgraph, representing the nominal carrier frequency of the radio station. We’ll add the string key "nomfreq" and its respective floating-point value to the PDU using the PDU set block, just before the RFtap Encapsulation block:
Sidenote: What is a PDU?
GNU Radio terminology can be overwhelming at times: there are streams, stream tags, message ports, asynchronous message passing interface, polymorphic types (PMT), messages, protocol data units (PDU)…
A PDU in GNU Radio is a special kind of message used to store raw packet data and its associated metadata in a convenient package. It consists of a vector of bytes (the raw data of the “packet”), paired with a dictionary containing arbitrary metadata about the packet:
PDU:
    metadata:
        key1: value1
        key2: value2
        key3: value3, etc...
    data:
        68 65 6c 6c 6f 20 77 6f 72 6c 64 ... (raw data bytes)
The RFtap Encapsulation block looks for known keys in the received PDU metadata, such as freq, freqofs, snr, dlt, and encodes these keys (and values) into an RFtap header, which is then prefixed to the raw data bytes, thus creating a RFtap packet containing user’s encapsulated data packet. These fields can then be accessed in Wireshark for each individual packet. The key names in GNU Radio are identical to the key names used in the Wireshark RFtap dissector (rftap.freq, rftap.freqofs, rftap.dlt, etc).
END OF SIDENOTE
That’s all! We can now see the same RDS packets in Wireshark, with each packet having a carrier frequency property accessible via rftap.nomfreq. Notice that when the radio frequency is changed in GNU Radio, the RFtap carrier frequency is updated in real-time in Wireshark.
We can now save all RDS packets with their associated RF metadata in a pcap file:
$ tshark -i lo -w allmypackets.pcap
Run analytics, such as collecting all station IDs (rds.pi, aka “Program Identification”):
$ tshark -i lo -q -T fields -e rds.pi
Retrieve frequencies and alternate frequencies used:
$ tshark -i lo -q -T fields -e rftap.nomfreq -e rds.altfreq
Run analytics on all RDS and TMC messages received, etc.
Conclusions
In this post we’ve shown the basic use of the RFtap protocol, including how to generate and process RFtap packets and how to add support to a new protocol in Wireshark. We’ve demonstrated the benefits RFtap can provide in bridging SDR platforms such as GNU radio and network analysis tools such as Wireshark.
The modified RDS flowgraph and lua dissector are available in gr-rftap/examples.
Ready for more? Read Using RFtap to Detect Wi-Fi MAC Spoofing.